Dragon's Dogma Dark Arisen Killing Firedrake Easy
Sorcerer/Mage Guide for Soloing Bitterblack Isle on Hard Mode in "Dragon's Dogma"
Just a robot girl that likes thinking and plays a bit of RPGs when there's nothing else to do.
Introduction
This is a continuation of my previous walkthrough guide. It will describe what to do in each area of the Bitterblack Isle. A large chunk of this will be done using strategic tricks, where enemies will fall or be attacked from a place they cannot reach. However, all the bosses will be fair fights.
We will be predominantly using the Holy Bolt setup. However, I suggest replacing Fortitude with Attunement (Magick Attack is increased by 10%).
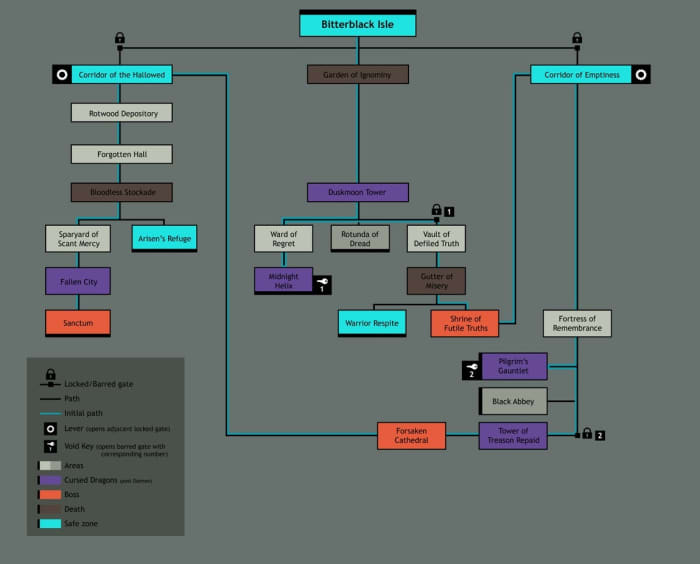
Map
First Part
Garden of Ignominy
- Original: This is a pretty simple location where everything can be killed with holy bolts. Do not try to kill Death.
- Post-Daimon: I would run past everything here.
Duskmoon Tower
- Original: The location is empty.
- Post-Daimon: Usually, there will be either a Firedrake with Hellhounds or a Thunderwyvern with Gargoyles. Gargoyles are dangerous. Consider having 100% petrification resistance. With this build and restricted consumables, we cannot kill a Thunderwyvern, so ignore it. A Cursed Dragon may also spawn. Holy bolts will shred it.
Rotunda of Dread
- Original/Post-Daimon: This is the first farming location you access. Level up to 100 there. Abuse holy bolts from the high ground. Make sure to get two Rings of Pearl there.
Ward of Regret
- Original: There will be a Skeleton Lord. Right in front of him, there is a place you can climb to. Use it.
- Post-Daimon: Optional
Midnight Helix
- Original: Be careful with the Gargoyle. It is best to fight it on the bottom so it cannot throw you off.
- Post-Daimon: Optional
Vault of Defiled Truth
Scroll to Continue
Read More From Levelskip
- Original: You will face a Cockatrice there. I have never thought them to be difficult. If you encounter a Siren, use the Dark Affinity.
- Post-Daimon: There will be two Gorecyclops. Run past them to the second floor and use holy bolts.
Gutter of Misery
- Original: This is a pretty simple location where everything can be killed with holy bolts. If an Elder Ogre spawns, use the nearest waterfall to make it fall.
- Post-Daimon: Take your time and kill everyone. It shouldn't be hard.
The Gazer
- Tis an easy boss, Arisen. Stand on the staircase in front of its eye. Elemental damage can be ignored. Crippling Gazes are nullified by simply turning back. Just mind the Spire attacks. Use them to make it damage itself.
Second Part
Fortress of Remembrance
- Original: Death will spawn there. Reenter the area. Be careful with Succubi on the second bridge. The tower will also have an Eliminator. Don't fight it in a small area where you cannot avoid its attacks.
- Post-Daimon: The first bridge will be difficult to cross. There will be several Strigoi. I would even suggest leaving the area, resting, and coming back to change the enemies.
Black Abbey
- Original: It is just an excellent farming location. Leveling up to 120-130 will go fast there.
- Post-Daimon: This is where I got my sweet 200.
Pilgrim's Gauntlet
- Original: Use the Frost Affinity to kill Pyre Saurians. The rest is done with holy bolts. The Cursed Dragon can be attacked from where you took the key.
- Post-Daimon: Optional
Tower of Treason Repaid
- Original/Post-Daimon: Just run down, ignoring everyone. You can easily fall there when attacked, so it's not worth it.
Forsaken Cathedral
- Original: The most challenging enemies there are the Golden and Silver Knights. Don't let them come close.
- Post-Daimon: An Eliminator will spawn. Holy bolts should help you against it.
The Dark Bishop
- Use the Sanctuary setup. To avoid healing from holy bolts, use the Fire Affinity against the Cursed Dragon and the Dark Affinity against the Bishop.
Third Part
Rotwood Depository
- Original: Use holy bolts against Wraiths and dark bolts against Giant Saurian Sages. You will have to switch between the elements constantly, so this may be a bit hard. The Eliminator there is very limited in its reach. So, don't come close. If an Elder Ogre spawns, use the second floor and thunder bolts.
- Post-Daimon: It will be pretty much the same except for a Living Armor. I never kill it there. As if I could, hah. At this point, only a few things pose a real threat. The area does not have them.
Forgotten Hall
- Original/Post-Daimon: Corrupted Pawns can one-shot you with their third-tier spells. However, it seems they cannot reach you when you're on the balcony. A safe spot!
Bloodless Stockade
- Original: There will be Corrupted Pawns and an Eliminator. Make sure you stay out of their reach. It is pretty simple. The lower part of the area can be run through. An important thing to note, here you can complete the Accursed Errand quest. Purchase the Bane Archistaff and gold-rarify it.
- Post-Daimon: Additional enemies will appear. Everything can be easily killed with holy bolts. If not, ignore it. This includes Living Armors and Death. Both enemy types will be in the lower part.
Sparyard of Scant Mercy
- Original: There will be the first obligatory fight with a Living Armor. Make it fall from the second floor and finish it with holy bolts.
- Post-Daimon: Just run through.
Fallen City
- Original: An empty and peaceful location. Enjoy!
- Post-Daimon: Wyverns will rain down spells, and there will be several Eliminators. Jump on the roof and kill the Wyverns as soon as you can. The rest will be easy. I do not fight Living armors there.
Daimon
- The first phase: I usually come to him around level 140-150. All the gear should be at least dragon-forged. Holy focused bolts are the only way to go. Recast the Holy Affinity when he does his Vortex thing. I divide all his attacks into four groups:
- Physical attacks: These have to be focused on. Levitate and proper positioning will help to dodge them. As if there was a choice, heh.
- Ice Spikes: These are hard to avoid. Having 1200MD and 30% Cold Resistance will make them deal no damage.
- Seism: Although the casting animation is pretty distinguishable by the green color, this is hard to avoid. Whenever you see that animation levitate for as long as you can to avoid knockdown. I do suggest having two Rings of Pearl.
- Other elemental attacks: These are easily evadable.
- The second phase: You should be around level 200 with some decent gear. The best way to fight him is to stay as far as possible. This will save you from his Sweeping Claw attacks. This time he makes almost no fast physical attacks, so this can be considered even easier than the first phase. Just don't be hasty to recast the Holy Affinity.
General Tips
- Do not purify Bitterblack Novelties and Weapons 1-2. The former are pretty much consumables and useless augments. The latter can be bought from Barroch.
- Learn where Maneater is. If you want to do this without dying, this is a-must-know.
© 2022 Game Channel
Related Articles
Source: https://levelskip.com/rpgs/Sorcerer-Guide-for-Dragons-Dogma-to-do-BBI-Solo-Hard-Mode
0 Response to "Dragon's Dogma Dark Arisen Killing Firedrake Easy"
Post a Comment